

This article is about growing shiitake, but it can also be applied to other similar mushrooms such as oyster mushrooms, eryngii, enoki or lion’s mane, but you would need to choose slightly different woods. More about woods here.
So where to start?
Firstly, you need to decide how many logs you want (or need). One log per harvest gives between 200 g and 500 g per harvest. You should also consider how much you will be able to allocate and whether the location is suitable.
Location. Our aim is to keep the plant moist, so the location should be out of direct sun and not windy. A little morning or evening sun won’t do much harm, but by midday there should be shade. There are often droughts in Lithuania, which means that the logs will need to be irrigated in summer. Ideally, you should have a watering system that you can simply switch on when needed, without having to carry water with the sprinklers, which you may have to do several times a day (obviously only in dry periods).
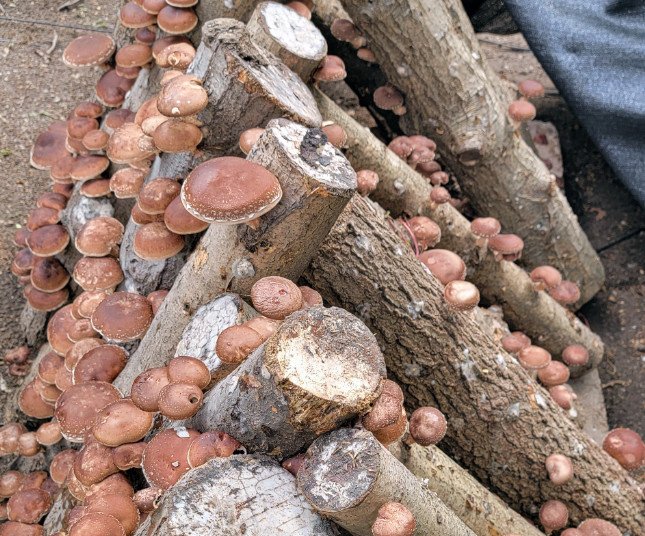
How much space will it take up? The logs are usually 1 metre long and about 10-20 cm thick. The logs are stacked in the wells first while the fungus is spreading, or more densely, i.e. 4-6 logs in a row (depending on thickness), with each floor stacked across the bottom one. Approximately as in the picture.

So one well will be 1m2. Height depends on location. The higher it is off the ground, the less moisture it will receive from the ground and the more it will be dried by the wind. For this reason it is recommended not to make a well taller than 3 logs. So we can store 12-18 logs per square meter, and more if you run out of space. After 6-12 months, when the fungus in the logs has spread, these wells will be too dense and will need to be thinned out by placing them in rows of 2-3, or by building them in A shape as in the picture. This is done to give the fungi room to grow.

Wood. Once you have decided how many logs you want, you can start preparing the logs once you have a suitable location. Oak is the most suitable for shiitake mushrooms, but it is more difficult to obtain. Birch is suitable and is abundant and inexpensive (if you don’t have your own forest, you can look in the classifieds for firewood in your area and many of them will let you come and buy uncut wood. Local forestry offices can also help). For other mushroom wood choices, see here. The standard thickness is about 15 cm, but we use 10 to 25 cm. If you have thicker ones, no big deal, just make shorter ones that one person can lift it.
When do we chop? The ideal time of year to cut logs is after the worst of the winter frosts, as spring approaches. As this is not a calendar decision, we look at forecasts and observe nature (as the sap appears, that’s the time). In Lithuania, this is usually in March. It is a good time to cut the trees before the leaves burst. After that the tree puts all its effort and energy into growing branches and leaves, leaving less nutrients in the trunk. Will fungi not grow if the wood is cut in summer? They will grow, but the yield will be slightly lower than on wood cut in early spring. Can I cut in winter? Yes, but the logs are slightly drier, especially during frosts, as the tree absorbs the moisture into the roots. Another danger is that if you cut in autumn or early winter and planting is not until spring, the chances of the wood catching some other fungus increase.
Preparing the logs. After the tree has been cut, we cut it into one metre logs. At this stage, it is very important to get the logs to the planting site as soon as possible, as leaving them in the forest can lead to other fungal spores infection. It is best to store the logs in the same way as after the mycelium has been injected. Do not leave it in pile for long. As there are a lot of moisture and little fresh air mold could appear. There is nothing more to do, just wait for planting. If you cut logs at the right time for planting, DO NOT sow mycelium immediately after cutting! The tree produces antifungal substances, so you need to wait at least 3 days, preferably at least a week, ideally 2 weeks. Can I inoculate in to old logs? If the log is more than 2 months old it is not recommended. Because A. Some other mushroom may already be living there, even though you can’t see it and it won’t necessarily be tasty 😊 B. It may already be incipient, so we reduce the chances of a successful mushroom cultivation.
Fungi and their types (Plugs or Sawdust). The logs are ready, we have time to order the mycelium (if you haven’t done so already, hurry up). Mycelium is ordered according to the number of logs. Pros of mycelium on plugs: easier to work with as no special tools are needed; a wider choice of packaging with different quantities (from 30 pcs per log); cons of plugs: this type of mycelium is much more expensive, double or more than sawdust. The pros of sawdust: twice as cheap as pins, the work is much faster using all the tools; the cons of sawdust: the standard pack is 4 litres (it is for 15-25 logs, no smaller packages). The special tools are also needed: a special syringe to inoculate the mycelium into the logs, a special drill bit is not necessary, but it speeds up the work a few times; an adapter for an angle grinder is not necessary either, but does wonders when you need to make a lot of holes. A bit of maths. We want to make 200 logs. Plugs: We will need about 8000 plugs (40 per log) at a cost of about €680, wax 6 kg at about €60, and a brush at €2. A total of 742 euros. Sawdust: We will need about 10 bags of mycelium on sawdust at a cost of 220 euros, wax 6kg about 60 euros, tool 45, and a set for angle grinder 43 and brush 2 for a total of 370 euros. So even if you buy all the tools there is a considerable saving.
How much do I need? It is easy to calculate the amount in plugs, 30 to 50 plugs per log depending on the thickness of the log. Packages come in packs of 30-500-1000 pieces. For sawdust it is a bit more complicated. A pack 4 liters of is sufficient for 15 to 25 logs , depending on the thickness of the log and the diligence of the planter. 😊 More on this in the Planting section.
And how much wax? Wax is usually about 20-30g per log, depending on the thickness of the log. And bee wax is suitable? Yes, and paraffin is also suitable, but the problem with paraffin is that it comes in many varieties and some of them are very brittle, so it flakes off quickly, you need to test before using. Our aim is to keep the wax for at least a month, until the mycelium is embedded in the log.
And where to store mycelium before usage? The mycelium wants to live, and we don’t want it to become too rampant yet, so we need to slow down its spread. The easiest way to do this is to store mycelium in the refrigerator at a temperature of +2 +6 C. Will the fungus die if I keep it at room temperature? No it will not die, but it wants to grow and the temperature is right so it can start to germinate. 😊 This is not a bad thing, but if the mycelium keeps trying to grow in the bag for a long time, it may start to rot. In short, if it sits for a week in a warmer environment nothing bad will happen, but you should try to keep it as close to +5 C as possible. Only temperatures above +25 C are dangerous. It is best to reserve the mushrooms to be delivered to you when it is the right time to plant, to avoid storage problems. 😊
Planting or not yet? It’s finally spring, the birds are chirping because the temperature is no longer below +5 C. It’s usually April here in Lithuania. Can we sow earlier? You can, but the mycelium does not spread in temperatures below +5 C, so if it is 0 C at night and barely rises to +5 C during the day, then practically nothing will happen, and the risk of the mycelium dry out, or animals wanting to feed on it (if it does not spread), is increased.
What? Washing logs? This is not a necessary procedure, but the logs have been lying around for a while, and some spores may have fallen on the live tree. So ideally we take a bath, add some “Fairy” or soap, soak the log and scrub it with a brush, rinse it and it’s as good as new. A simplified version: pour soapy water over a pile of logs and rinse with clean water for a few minutes, or even better, spray with some ‘kercher’. Is it necessary? Not really, it’s just our job to minimise the chances of infestation, which is one of the measures.
Finally, we’re planting! No, not planting yet, just preparing the site for work. If we are preparing a few logs, we don’t think too much about it. We work on the ground as much as we like, but if we do more than that, then it’s a good idea to think about a comfortable place to work. It is most convenient to work with the log at waist height. As we will be making holes on all sides of the log, it will need to be turned around. Furniture wheels mounted on the table or on stacked pallets will be a great help. Power tools will always be more stable than cordless tools, especially if you are working with an angle grinder. We will be waxing, so we will have to melt the wax somehow. The easiest way to melt it is to use an electric stove, on which we put a small pot, place two empty jars (which will contain the wax) in the pot, and add water to the pot (which will act as a buffer zone to maintain the temperature and transfer it to the jars better). And why the two jars? You will fill them with wax pellets and melt them that way. When you use the liquid wax from one jar, you will be melting another portion of wax in the other jar at the same time. You can use a travel gas stove, but if it is cold or windy you may have difficulties. Well, if you want to be romantic, it’s more fun to build a fireplace and melt the wax in a cauldron. 😊O So how many work places do I need? It all depends on how many logs you plan to make, how many tools you have, and how many friends you have willing to help. If there is only one tool, then it is most convenient for 3-4 people to work in a conveyor belt, i.e. one drills the holes, the second plants, the third waxes and the fourth carries (if you are working with an angle grinder, the one who drills the holes will be able to do the work as well as the carries, or else he will be scratching his nose).
Finally, we are now sowing. Planting with plugs – tools needed: Drill, a 6 mm drill bit, preferably with a stopper (if not available, you can mark with tape), a hammer and a paintbrush. Workflow: measure the plug (approx. 3,5 cm) and attach the brake or mark with adhesive tape after adding 1 mm more. Drill the holes at approximately 10-15 cm intervals in a diamond pattern, i.e. you start a row from the edge, turn the drill bit downwards and drill a new row further away from the edge, roughly midway between the holes above. ATTENTION When working with plugs, it is very important to clean the hole thoroughly, by drilling it a few times to make sure that nothing remains, otherwise the plug will not want to slide in. Then take the pluga and hammer them into all the holes. Then you take a standard paintbrush, dip it in the wax and dab it on all the pins to get a thin film on them. The carrier does its job and the seeding is finished.
Sowing with Sawdust – tools needed: a Drill, a 12 mm drill bit, a tool for inserting the mushroom into the hole, a paintbrush, additional tools to make life easier: a special drill bit with an adapter for an angle grinder, and the angle grinder itself (no need for the drill then). Workflow: we make the holes at approximately 10-15 cm intervals in a diamond pattern, i.e. you make a row starting from the edge, then turn the hole you found downwards and start a new row further away from the edge, roughly midway between the holes above. You place the mycelium on a sawdust in a container with a solid bottom. With the tool, prick the mycelium a few times so that the syringe fills up with the mycelium enough (a little force will be needed) and then push it out it into the holes made. The waxer shall dip the brush into the liquid wax and apply a thin layer to cover the entire mycelium. The carrier does his job, the sowing is finished.
Wait wait wait, can I? Common questions: 1. What about waxing the ends? You can. Pros: Helps protect the logs from infection through the ends and helps retain moisture. Cons: high wax yield, labour intensive and if you soak the logs, the wax will interfere with moisture absorption through the ends. Alternative: make a few extra holes in the ends with the mycelium planted in them to speed up the colonization of the ends of the logs and the mycelium will defend itself against invaders. And when partially waxed, this will significantly reduce moisture loss. 2. Can I make the holes one day and put the pins in the next? No, because during that day there is already a chance that something will get in that we do not want. It is best to do everything at once. 3. Can we at least postpone waxing? No, because the mycelium will dry quickly without wax.
The end. We load the logs into their living place as indicated at the beginning. You open a cold drink, or a warm one depending on the weather 😊Sowing is over!
And what next? We continue to wait patiently and watch. If it’s getting dry, we need to water it. If the bark and the ends of the logs are starting to crack and the bark is peeling off, the log is drying out. Moisture meters are available which can help monitor moisture. A log is sufficiently moist when it is about 40-50% moisture, and dry when it is 5-10%. And how do we water? As I said, the best way is to have a sprinkler system. If it’s very dry and you can’t carry water often, then you can cover the pile of logs with a blanket or even a carpet, which absorbs water well. That way, once you have watered once, the moisture will last longer. However, you cannot keep the cover on for long, because if there is no air circulation, mold may start to grow up. What if mold develops? The good news is that there is plenty of moisture, but not enough ventilation, so we make wider spaces between the logs and take off all the covers.
When we will see first mushrooms? It’s a complicated question, because a lot depends on the nature of the area. If you want to taste mushrooms this year, here are some tips: don’t delay planting, the earlier you plant at the right temperature, the better. Mushrooms only start to grow when the mycelium has fully spread, i.e. fully occupied the log. The thicker the log, the longer it will take, and the more holes you make, the faster the mycelium will spread.
Cold shock. Once the mycelium is fully established, we can artificially create the conditions for the fungus to think that autumn has arrived and it’s time to grow mushrooms. So we need high humidity and a sudden drop in temperature. The easiest way to do this is to drop the log into cold water (at least 10 degrees colder than the air) for 24-48 hours. Japanese wisdom suggests that it is a good idea to tap the end of the log with a hammer to simulate a tree falling. And when to soak? If you sow in the spring, it is likely that the thinner logs in the autumn will have already fully inoculate the log, but in the autumn the conditions are already right for mushrooms to grow, so there is no need to soak. So lets plan to soak only for next year. What to do if there is no lake? You can make a pool out of the same logs or pallets, just stack them up on the sides to leave a big enough empty space in the middle, and put a thicker film in. But it won’t fit all logs! Do you really need all the logs to yield at once? It’s just better to throw in a few logs, then a few more a few days later, and you’ll have fresh mushrooms all the time. After soaking, you need to take a break of 6 weeks before you can soak same log again. What if I don’t want to soak? No big deal, then you will harvest in autumn and sometimes in spring, when the conditions are naturally right in nature. How do I know if the mycelium has spread across the log? The best indicator that the mycelium has fully spread is the mushroom that has grown, but the mycelium can also be seen on the log itself, with whitening on both ends.
More questions? 1. How many years will I harvest? Think of the log as a fuel tank, every harvest uses some fuel, the more intensively you ask for a harvest the faster the fuel will be used up, and the bigger the fuel tank the more fuel you can fit. This is also true when you choose the type of wood, say oak is a hard and heavy wood, so it has a lot more fuel than alder, and the same amount of work. 😊